

If you’ve ever felt a chilly draft seeping through your front door on a blustery Ottawa winter day, you know how uncomfortable it can be. Drafty doors not only make your home less comfortable but also strain your heating system and increase energy bills. The good news is that weather-stripping your doors is a simple and cost-effective solution to seal those gaps and keep your home warm. In this guide, we’ll walk you through the benefits of weather-stripping, how to identify leaks, and provide a step-by-step guide to properly weather-strip your doors. Whether you’re a DIY enthusiast or prefer professional help, this guide will help you keep Ottawa’s winter out and comfort in.
Why Weather Stripping Matters (Energy & Comfort)
Weather-stripping involves sealing the movable joints of a door to prevent air infiltration. Air leaks can account for up to 35% of heat loss in a home. Gaps around doors are a major contributor to this heat loss. By sealing these gaps, you can significantly reduce drafts and heat loss. Stopping drafts not only makes your home more comfortable but also reduces the strain on your heating system. In summer, it keeps hot air and bugs out and AC in. Ottawa homes, especially older ones, often have worn-out weatherstripping. Rubber can crack with age/cold, or felt strips compress over time. Replacing or adding new weather stripping is a low-hanging fruit in home improvement. Additionally, weather-stripping can help block noise and fumes and prevent tiny insects or even mice from finding an easy way in.
Common Areas Where Doors Leak Air
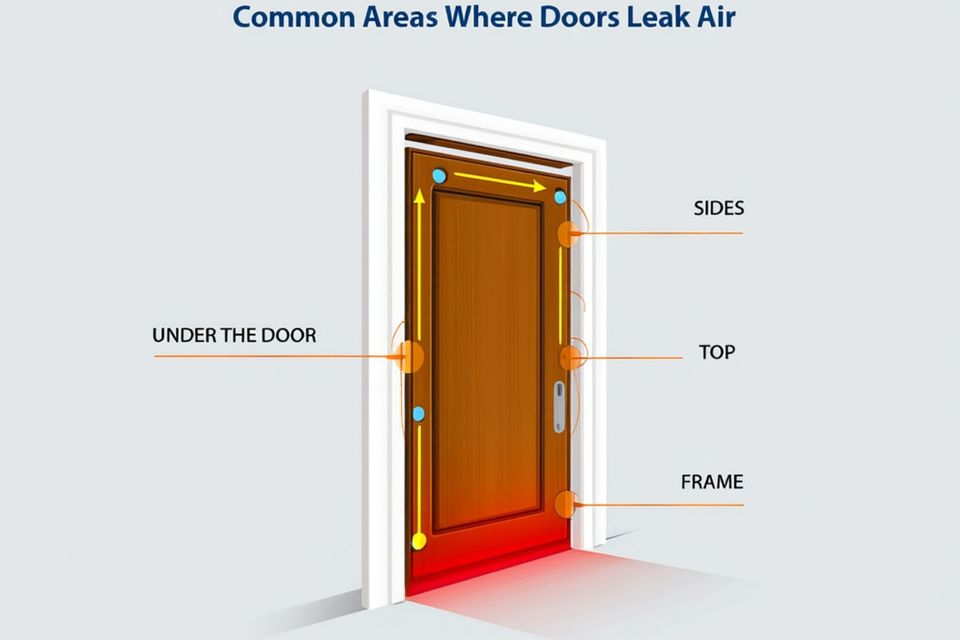
Drafts typically occur in the following areas:
- Under the Door (Threshold): The gap at the bottom is notorious – if you can see light or feel air, that’s significant. Many doors have an adjustable threshold or a door sweep; if not, one should be added.
- Along the Sides and Top of the Door Frame: Doors usually have some weatherstripping in these spots, but over years it can become brittle or detached. The latch side and the top are where cold wind can whistle through if not sealed. The hinge side can leak if the door warps.
- Around the Door Frame (Casing): Sometimes the air isn’t between door and frame, but between the frame and wall (if insulation or caulk there has failed).
To identify leaks, you can perform a simple test: on a cold day, run your hand along the edges or do the flashlight test – have someone shine a flashlight from outside at night around the door; if you see light, you have gaps. Or the dollar-bill test: close the door on a dollar bill; if it pulls out easily without resistance, the seal is weak.
Types of Weather Stripping for Doors
Here are some common types of weather stripping available:
1. Adhesive Foam Tape
Comes in rolls (closed-cell foam or rubber) with peel-and-stick backing. Various thicknesses available. Great for door frames – you apply it to the stop where the door closes against. It’s inexpensive and easy, but might compress and need replacement every few years. Good for small to medium gaps.
2. V-Strips (Tension Seal)
Long strips of vinyl or metal that form a “V” shape that spring out to press against the door edge. They are nailed or stuck along the sides of the frame. Durable and nearly invisible when installed. Ideal for the sides/top of a door where you want a constant springy contact.
3. Door Sweeps
Usually a metal strip with a vinyl or bristle seal that attaches to the bottom of the door. As the door closes, the sweep drags along the threshold sealing the gap. Some sweeps are just an L-shaped piece you screw to the inside bottom of the door; others are more automatic or have bristles. They can seal even large gaps under the door.
4. Under-door Draft Stoppers
Mention the foam “noodle” or fabric draft snake you can place at the bottom of a door. These are not fixed and are more temporary (or for interior doors), but worth noting as an easy fix especially for unused exterior doors in winter.
5. Bulb or Tube Gaskets
Some doors (especially newer or with specific kits) use rubber bulb weatherstripping that fits into a groove in the door frame. If your door has these, you can replace the bulb gasket when worn. They provide an excellent seal.
6. Spring Metal Weatherstripping
Common in older wood doors; thin bronze strips nailed around frame. Very effective and long-lasting, though a bit tricky to install evenly.
Choose the type that best fits the gap size and door usage. Often a combination is used (e.g., V-strip on sides/top + door sweep at bottom). Advanced View can recommend suitable products or install high-grade weatherstripping for you.
Step-by-Step: How to Weather-Strip an Exterior Door
Follow this DIY-friendly guide:
Check and Remove Old Stripping: Open the door and inspect existing weatherstripping. Gently pry off any old adhesive foam or nail-on strips that are worn out. Clean the surface (remove old adhesive with rubbing alcohol or a scraper so new strips adhere well).
Measure the Gaps: Determine the width of gaps you need to seal. Also measure the width of the door frame sides and top to cut new material to length.
Apply New Weatherstripping to Frame: For foam tape – cut pieces for each side and top. Peel backing and press firmly along the door stop where the door meets the frame. For V-strip – cut to length, peel adhesive or tack nails starting from top going down, ensure the “V” will compress when door closes. Make sure corners meet without gaps.
Install a Door Sweep (if needed): Measure door width, cut sweep to size if required. Most sweeps screw into the bottom inside face of the door – mark and predrill small pilot holes, then screw it on so the rubber fin or bristles just lightly touch the threshold. Adjust as needed.
Adjust the Threshold: If your door has an adjustable threshold (many aluminum ones have screws that raise/lower a portion of it), adjust it to snug up to the door sweep. If not adjustable, ensure the sweep fills the space.
Test the Door: Close it and see how it fits. It should close firmly but not require excessive force. Walk around and feel for drafts, use the flashlight test again. If light still leaks at corners, add small foam corner pads or adjust the strips. Ensure the door latches properly.
Finishing Touches: For wood frames, you can paint over certain weatherstripping to blend with trim. Clean up any adhesive liner scraps.
Emphasize safety: use a sturdy step stool if working on top of door, wear gloves when handling metal strips, etc.
Additional Tips to Seal Door Drafts

Here are some additional tips:
1. Seal Door Frame Cracks: Use caulk around exterior door frame trim to seal any cracks between the frame and house siding/wall. A bead of exterior-grade caulking (silicone or polyurethane) along the edges will block that.
2. Check the Door Alignment: If a door is badly misaligned, weatherstripping can only do so much. You might need to tighten hinge screws or even plane a bit of the door.
3. Storm Doors: Installing a storm door can add an extra layer of insulation and draft protection. It’s a secondary outer door that cuts wind before it hits your main door. In Ottawa, storm doors can improve efficiency of older doors significantly.
4. Weather-Strip Garage Entry Doors: Don’t forget the door between an attached garage and the house – it often gets overlooked but should be sealed as tightly as an exterior door for carbon monoxide safety and thermal reasons.
5. Regular Maintenance: Weatherstripping isn’t set-and-forget forever. Check it every season change. In Ottawa’s climate, the constant temperature swings can compress or harden materials. Replace foam strips perhaps every 3-5 years, rubber sweeps if cracked, etc. Keep an eye that screws stay tight on sweeps and thresholds.
6. Windows Too: While on sealing, remind that windows benefit from weather-stripping and caulking too. If a reader is sealing doors, maybe check window seals or use plastic film kits on very leaky old windows as a temporary fix until replacement.
When to Call a Professional
Sometimes a door may remain drafty even after DIY weatherstripping.
Suggest calling experts if:
Advanced View offers weather-stripping as part of door installation service, and we ensure every entry door we install is snug and draft-free. We can also retrofit better seals on existing doors.
Suggest calling experts if:
- You see water leaks as well as air – that could indicate a flashing issue above the door.
- The door is very old, ill-fitting or rotted – perhaps time for a new energy-efficient door entirely.
- You’re uncomfortable doing it yourself or lack the tools – a pro can usually weatherstrip a door in under an hour.
Advanced View offers weather-stripping as part of door installation service, and we ensure every entry door we install is snug and draft-free. We can also retrofit better seals on existing doors.
Conclusion – Seal in the Warmth
Weather-stripping doors is a simple yet effective step to improve your home’s comfort, especially in Ottawa’s cold months. A little effort on a weekend can lead to a noticeable reduction in drafts and energy waste. Encourage readers to tackle this DIY or reach out for help, and to enjoy the benefits immediately – fewer chills near the door and potentially lower heating bills.
Tired of feeling cold air seeping in?
Contact Advanced View Windows & Doors for professional door weather-proofing or to explore new energy-efficient doors for your Ottawa home. Let us help you keep the winter where it belongs – outside!
Tired of feeling cold air seeping in?
Contact Advanced View Windows & Doors for professional door weather-proofing or to explore new energy-efficient doors for your Ottawa home. Let us help you keep the winter where it belongs – outside!
Contact Us Now!
Give us a call or send us a message using the form.